The FFmpeg Recorder is an home-made application that lets to record a movie. It is based on the FFmpeg applications to acquire the streams coming from the webcam and microphone.
Project description
Github repository: https://github.com/angelosalatino/FFmpegRecorder
Platform: currently only Linux (never tested on Windows)
License: LGPL
Current version: 1.0
Issue tracker: Here
Key features
- capture a video stream from webcam (either internal or external)
- capture an audio stream from microphone (either internal or external)
- select the correct capture peripherals, in the options panel
- test the audio and video device before capturing
Dependencies to build the project
Qt Framework – 4.0 or higher. Download here.
FFmpeg – type the following command on terminal to install.
| sudo apt-get install ffmpeg |
|---|
Ready to use builds
Just build!
Graphical User Interfaces
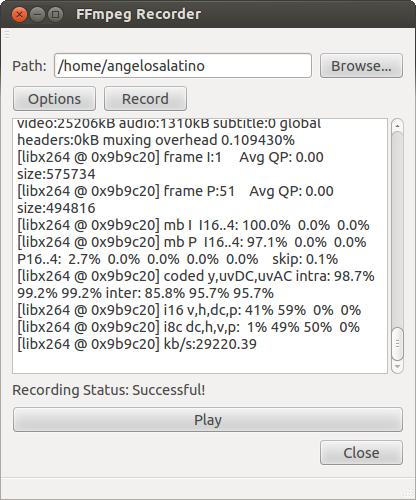
When the application is launched the GUI should pop up on the screen. It looks like to the image below. Starting from the top there is a text box to set (with the Browser button or just typing) the path of the destination folder of the movie.
Under the text box there are two buttons: Options and Record. The first one lets to show another GUI that allows to set up some options (see the second image below). With this last GUI is possible to set the correct devices for the streams (audio, video or both) and test them. The second button allows to record using the chosen devices. When the application is in the recording phase, this button allows also to stop the recording.
Under this two buttons there is a text area that allows to know some information about the recording phase.
At the bottom there are the Play and the Close button. The first one allows to play what is previously recorded whilst the second button lets close the application.
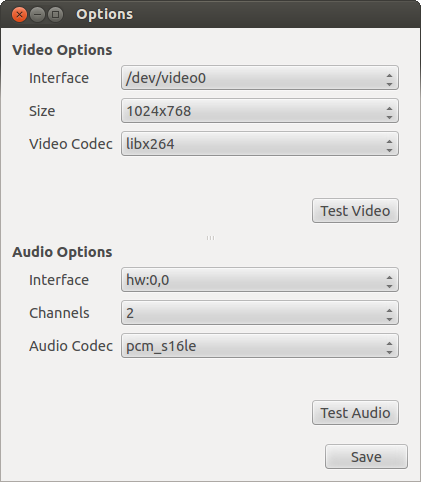
The second GUI that, as I said before it comes out when the button Options is pressed, is shown below. With this form is possible to set some options like the video interface, the size of the frame, the video codec, the audio interface, the number of channels and the last but not the least, the audio codec.
However there are also three buttons. The button Save lets to save the options and then close the GUI. With the Test Video button, when it is pressed, another GUI pop up that allows to watch what the video interface can see. It’s a kind of feedback to know if the selected video interface is correct. With the Test Audio button, when it is pressed, a background application will record six seconds of the sounds that the audio interface can listen. Then, the same button will change in Play, that will let you know that is ready to play what it has been recorded, to test if everything has been done correctly.
Technical information
This application uses the abstraction of the Qt Framework to emulate the terminal with the QProcess objects.
At the moment the application lacks of some settings.
Thanks
This application is also based on the tutorial of K Hong (…) that I would thank. However I want also thank with whoever wants to use this application, give suggestions, make it bigger and better.